PAGES

Friday, November 13, 2015

NEIGHBORS OLD FENCE PUT TO GOOD USE

The world would be a better place if we all had a neighbor like I do. We call each other before we toss out anything, just in case one of us need it.  Such is the case with the old fence they were tearing out.  It had been there forever and weathered just perfectly!  Originally, I just wanted a section for some crafts.

Eventually I ended up going back for a lot more!

Ava was all on board and took it upon herself to haul the first section over.  


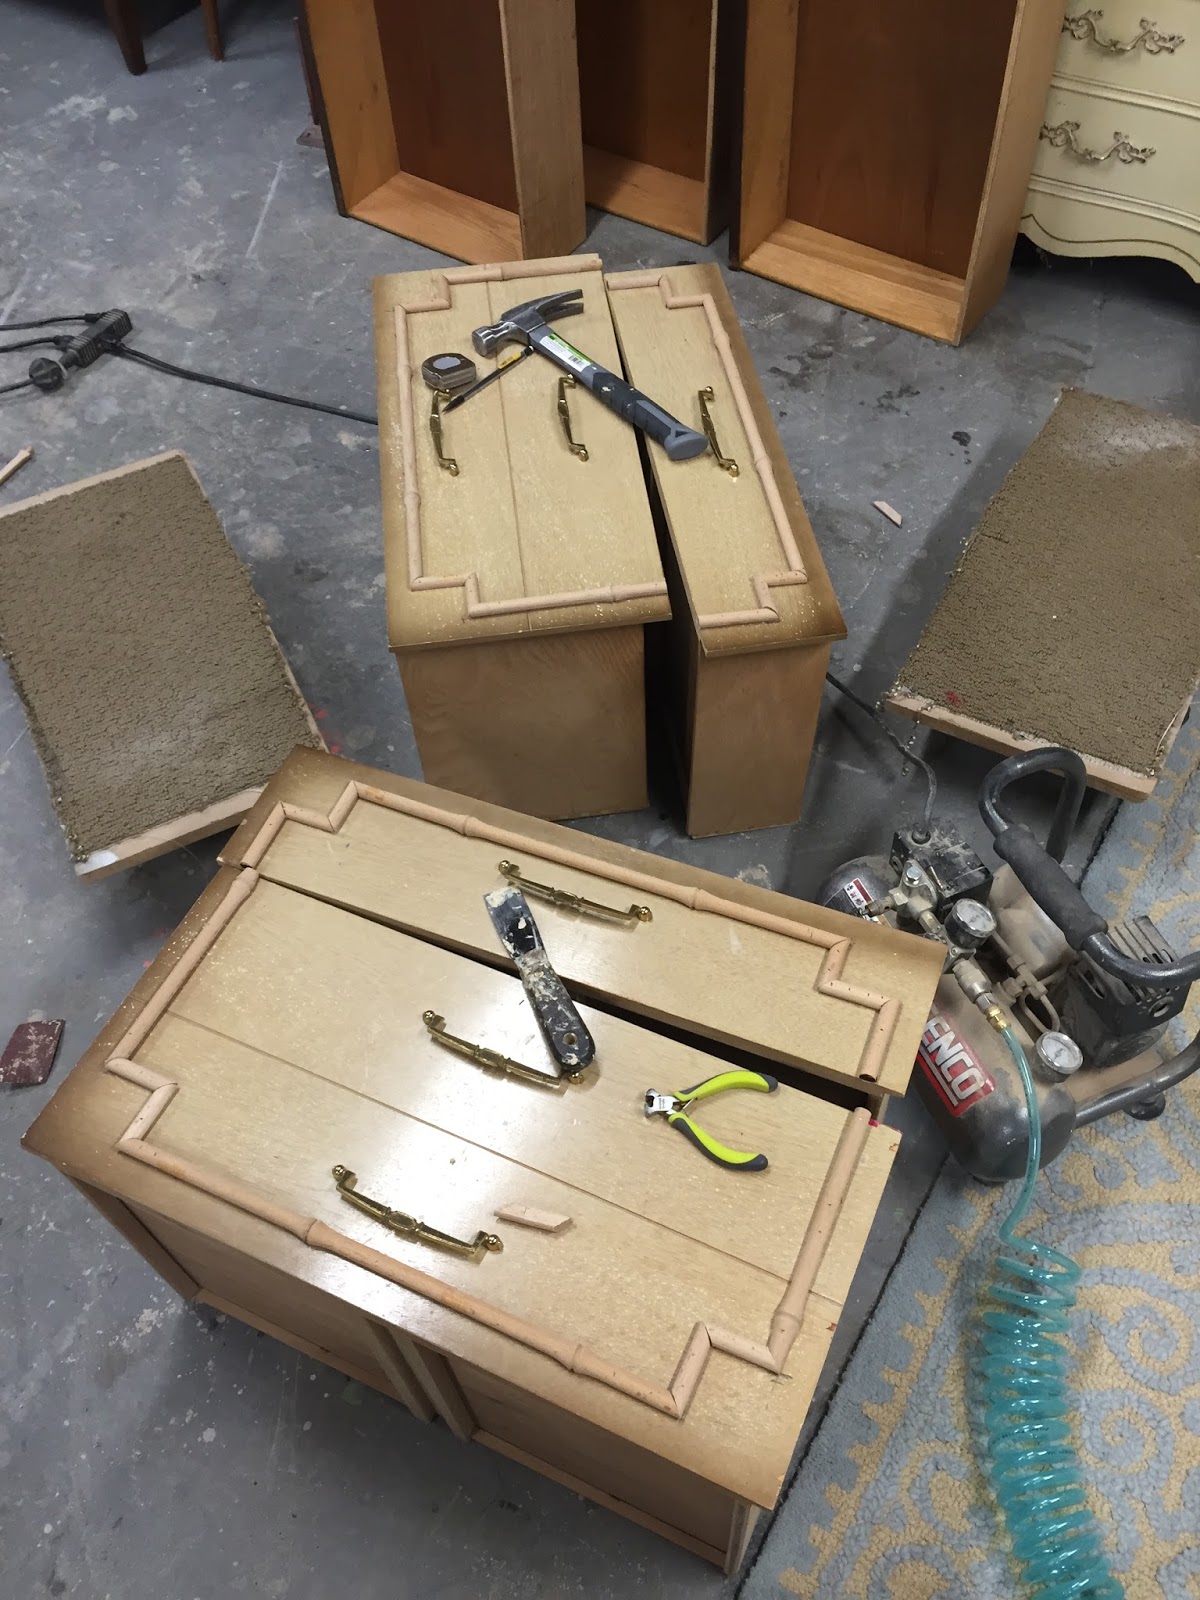
A client brought me this dresser. It that had the worst "professional" finish I have ever seen, complete with many drips and a horrible spray job.  Granted, this was in the middle of me prepping it but it needed a complete overhaul.  

My clients were very open to anything and said "do whatever you think will look good" which is fun and terrifying all at the same time.


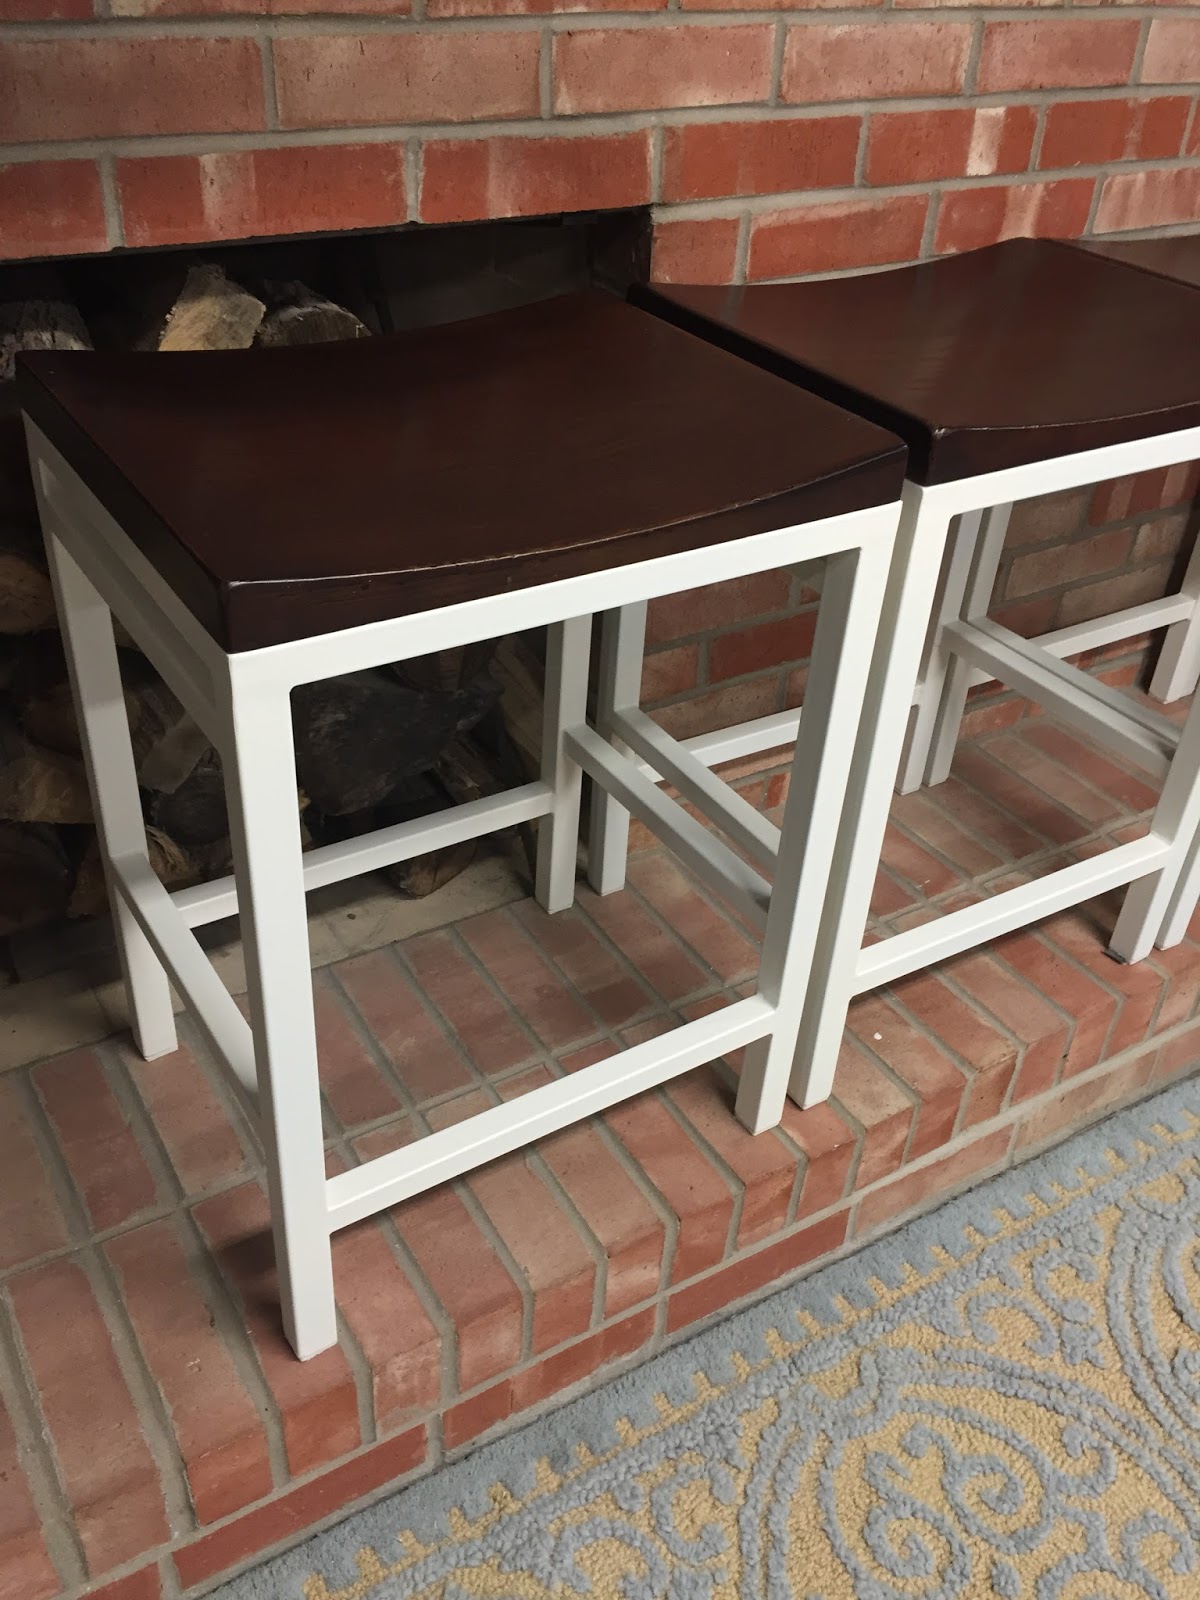
Knowing now, how well the fence posts cleaned up after pressure washing, I decided to use them for the top. 

Construction adhesive and a few brad nails is all it took.


 After trimming out the edges with ripped down pieces, I added a few clear coats to bring out the natural color of the wood and it looks beautiful giving the perfect rustic modern look I was hoping for.

I also decided to use the same wood on another dresser. A lot more work actually went into this makeover but the herringbone wood pattern on top was definitely the best part.

The before photo


I wanted to add feet and in this case, to do it right meant I had to cut off the base of the dresser.


Naturally, it was a huge process as I had to rebuild the base to make it sturdy enough for the leg brackets to be added.  I then trimmed it out with MDF.


The trickiest part was finding the center line so that it would be even.  I cut the boards on my skills saw at a 45 with just a little overhang. After glueing and a few brad nails, I let sit overnight and cut edges with a skills saw (and guard for a straight line).
I also added the trim to edges after wards.


A few clear coats makes a huge difference!!  I really love how it turned out!


 We also found a few other fun things to do with the wood:)


Sunday, July 26, 2015

USING A DILUTED DYE STAIN AS AN ADDITION TO YOUR REGULAR STAIN TO CREATE EVENNESS AND DEPTH

In case you missed it, I goofed and accidentally painted the top of this dresser when my client wanted it stained...oops!  But like I always say, anything can be changed and although maybe a little more work, it's really not the end of the world. 

I also decided it was a good opportunity to share this staining tip with you.

 After I stripped the top I added one coat of General Finishes Java Gel Stain.  Photo below is after that one coat. 
It stained nicely after one coat but had a little blotchiness going on.  I was going to do another 2 or 3 coats but decided to do what I have done a few times before...add a dye stain mixed with clear coat. 


Here is the result after I used one coat of the mixture and 2 more clear coats added over top of that for protection.


This is a pretty cool product.  It can be used alone but is VERY pigmented and like it says, is a dye.  so yeah, I personally wouldn't put it on alone.  I add it to a water base clear coat. I personally feel you can add to any water base clear coat but it's probably smartest to add to a GF clear just to be safe

I have experimented with different ratios but find that 1:4 (ish) ratio is usually good for the projects I have done.  
It basically evens out and darkens the overall color of a stained piece.  For me, this has allowed me to NOT have to do many extra coats of stain to get the depth I want on many pieces. 


Another recent example is how I used it on these barstool seats.  I wish I had a good before photo but naturally, I don't.  They were in decent, but not perfect condition.  I added a coat of this mixture after lightly sanded them, to create a nice, even, new finish.  As always, I also add a few coats of clear afterwards too.

You can spray or do by hand.  I have done both and both work well.  
Because I had a batch mixed already I sprayed the seat but did the dresser by hand.

There are many different color dye stains but seem to usually reach for the dark brown. 

Hope this helps someone and good luck!


Sunday, June 21, 2015

DRESSER TRANSFORMATION…ADDING BAMBOO TRIM

First let me say, and I can't believe I am saying this because of the serious painintheassness involved (and yes that is a word, now anyway) …I am sooooo glad that the designer who picked this piece wanted to do a super high gloss, modern finish in a fun color!  That gorgeous gold hardware didn't hurt at all either.

Really just makes all of the hard work a little more worth it when I am in love with the finish too:)


I've had this idea of adding bamboo trim to a dresser in my head forever, but never found time. Actually, I have a LOT of ideas in my head that I don't have time for, just as I'm sure we all do.

I have always been a huge fan of Bali Hai furniture and really, anything with bamboo or rattan.  Maybe it's the combination of modern, boho, glam, vintage and funky with a touch of elegancy that makes me love it so much!   Whatever it is, because I am eclectic with my own personal design, it's always been a favorite.


Finding the moulding proved to be more way difficult than I thought it SHOULD be.  I mean, was I the only person in the world looking for this stuff?? Evidently I was.

Half round moulding would have obviously been a lot more easier to work with but that was even more difficult to find.   I finally found a website called Beacon Hill. They did have half round but either only "1 left" or "not in stock" every time I checked or called, so I just went ahead and order the full round moulding fully aware that I had extra work ahead of me.

I needed a flat surface for the bamboo so that it would sit on the flat drawer. Because of the uneven nature of this  trim, I could not get a straight cut with either my table saw or chop saw and really, these were not safe options anyway.  Although an orbital sander would work just fine, I have a large belt sander that came if very handy.  I do not use this tool often but when I do need it, I am always so glad to have it on hand.


Trying to cut 45's on my chop saw with this "bumpy" trim was a not working and truthfully, I wanted to quit after a few test cuts.
  
I ended up creating a 45 degree angle template using a clamp and a piece of wood after measuring with true a 45 degree angle.

I used this as my guide for the trim and because it was a soft wood and small piece, it took no time at all to sand it down.

In photo below you can see I set up one for each angle/side.  Watch your little fingers!!


I nailed the trim in place.  The angled corners were tricky but they all turned out pretty good.  Nothing that a little filler couldn't take care of.


You will notice that the old hardware is still on here.  At this point, I had no plans for the piece and was potentially going to use the old hardware.  If I were to do it over again, I would have sanded and filled in the hardware holes, making it a little easier down the road.


I filled in brad nail holes, large hardware holes and did a bead of caulk around the moulding to give it a very polished and finished look.


For fun, here is the "before" picture.


This is probably one of my favorite makeovers and so proud of how it turned out.

I can't believe I am saying this but I'd would really like to do this again and have another piece in mind:)


Friday, June 5, 2015

AVAILABLE COLORS


These are my currently available colors.  The "UNFINISHED- FOR SALE" pricing is when done in one of these stock colors. 
I try to keep them updated as they are constantly changing.  I may only have enough of a particular color to do one piece but don't be afraid to ask! And remember, for a $40 charge, I can always get my lacquer custom mixed in any color for you:)

REDS AND PINKS

SW 7600 BOLERO


MARTHA STEWART - MAIN LOBSTER


BM SALSA DANCING 


MS TERRA ROSA


SCRUMPTIOUS - Olympic A32-4


SW CRABBY APPLE 


MAGENTA


SW FOXY 6333


SW IMPATIENT PINK 


SW ARRESTING AUBURN 


SW STOLEN KISS 


BM SMOLDERING RED 


YELLOWS AND ORANGES


STARTLING ORANGE


SW KNOCKOUT ORANGE 


PUMPKIN CREME


THANKSGIVING- BEHR-


BUTTERED YAM


BELIEVABLE BUFF 


BM YELLOW FINCH


HAWTHORNE YELLOW


MARBLEHEAD


GREENS


RELISH


KELLY GREEN 


RESTORATION HARDWARE-SEA GREEN


SPONGE GREEN


GECKO


SPRING MOSS


ALEXADRITE

DAKOTA WOODS GREEN


AMAZON MOSS

FESTIVAL GREEN


RECYCLED GLASS


OLIVE BRANCH


SWEET VIBRATIONS


CABANA GREEN


PURPLES

PASSIONATE PURPLE


BLACKBERRY


CINNAMON SLATE


BLUES


YOSEMITE BLUE (CUSTOM MIX BUT VERY CLOSE TO THIS BM COLOR)


SLATE TILE


MEDITERRANEAN

Hexadecimal Value: #657C81
LRV: 18


BLUE DEPTHS


TROPICANA CABANA


COVINGTON BLUE


PROVINCIAL BLUE


DEEP SEA DIVE


AQUARIUM


MILL SPRING BLUE


MOUNT SAINT ANNE


TURKISH TILE


STRATTON BLUE


COVINGTON BLUE


BLUE DRAGON


PRUSSIAN BLUE


PEACOCK BLUE


MAXI TEAL


BRACING BLUE


BIRDS EGG
BLUE PLATE


BROWNS


TOASTED CHESTNUT


TOASTY


MESA VERDE TAN


BM SADDLE BROWN  


CHATEAU BROWN


GRAYS

SEALSKIN


TIMBER WOLF


REPOSE GRAY

KENDALL CHARCOAL


CHELSEA GRAY


BM WOLF GRAY 


SLATE TILE


ANCHOR GRAY


AMHERST GRAY