PAGES

Friday, May 16, 2014

SEWING CABINET MAKEOVER

I have revamped a few sewing cabinets using a piece of back painted glass but this time the customer didn't want none of that and was hoping to have a solid top.


It started off looking like so….

And here is what we ended up with….

I picked up a piece of this from Lowes and cut to side.


After softening up the edges with my sanders, I wiped it down and stained it.  I used some left over board to find the stain I wanted bc my client didn't want it too dark.

Brushed on and let sit for a bit...

I wiped off. I really like how it looked after just one good coat of Minwax Chestnut, so decided to leave good enough alone.  Something I rarely do:)


After.
I am loving the rustic look of this top.  After the stain dried, I sealed with 3 coats of clear.  The graining raised a ton so sanded very well between coats.


Saturday, May 10, 2014

I TILE OVER EXISTING UGLY LAMINATE TOO!

No ugly surface is safe from me…evidently I will tile over just about anything!  I didn't really know this  about myself but like I have mentioned before, DIY BUDGET updating is waaaayyyy different than a new build or gut/renovation job.

Here is where we started. Looking back, the wood cabinets were not bad and knowing we would be gutting this room, probably should have just left them…but that's just not what I do!

We cut the corner part off and was left with a raw edge that needed to be covered. We also removed the lower shelf to house our tv. Because you could loose a small child in the 3" thick nasty and very old carpet, we removed that and replaced it with (very cheap and even nastier) carpet.


Because this room, like the kitchen was going to be gutted at some point, I wanted to spend little to no money. Luckily I had just enough left over travertine tile from a shower in our last house to cover this countertop.
This isn't the tile I would choose for this house or what I would have purchased but hey, it was FREE!

I had a handful of 12" x 12" tiles and 6" x 6" tile.  I played with a pattern until I figured out how to make them fit with very little cuts.  Then ripped down 12" tiles for the drip edge.  I also had enough grout (well, 2 bags of different colors I mixed together…see, I am CHEAP!)

I then added molding to the back to cover the seam.  Something I would not do in a kitchen but it was a quick and easy solution for this project.


Even did a fancy little design with the bit of marble marble I had left!


 Ok, this is a shot I wanted really hoped to avoid wanted to show the entire countertop. And you might notice the color patches on lower cabinets…my quest to find the perfect color for kitchen cabinet trickled into the den! 15 shades of gray later, (I think) I found my color:)

I really have a love/hate relationship with this room!  I hate the ugly paneled walls, the old inefficient window, the cheap carpet, the scratched up leather couch. But I love the fact that this is where we watch movies, kids laugh and friends hang.  So even when I redo this room, it will definitely have to be "kid friendly".


Tuesday, May 6, 2014

LOVING ME SOME 2 TONE FURNITURE!

I can't get enough of mixing wood and paint.  I always think it looks so classy no matter style!

Here is a set I just finished up today as well as a few other pieces I completed in the past 2 weeks.


Wednesday, April 30, 2014

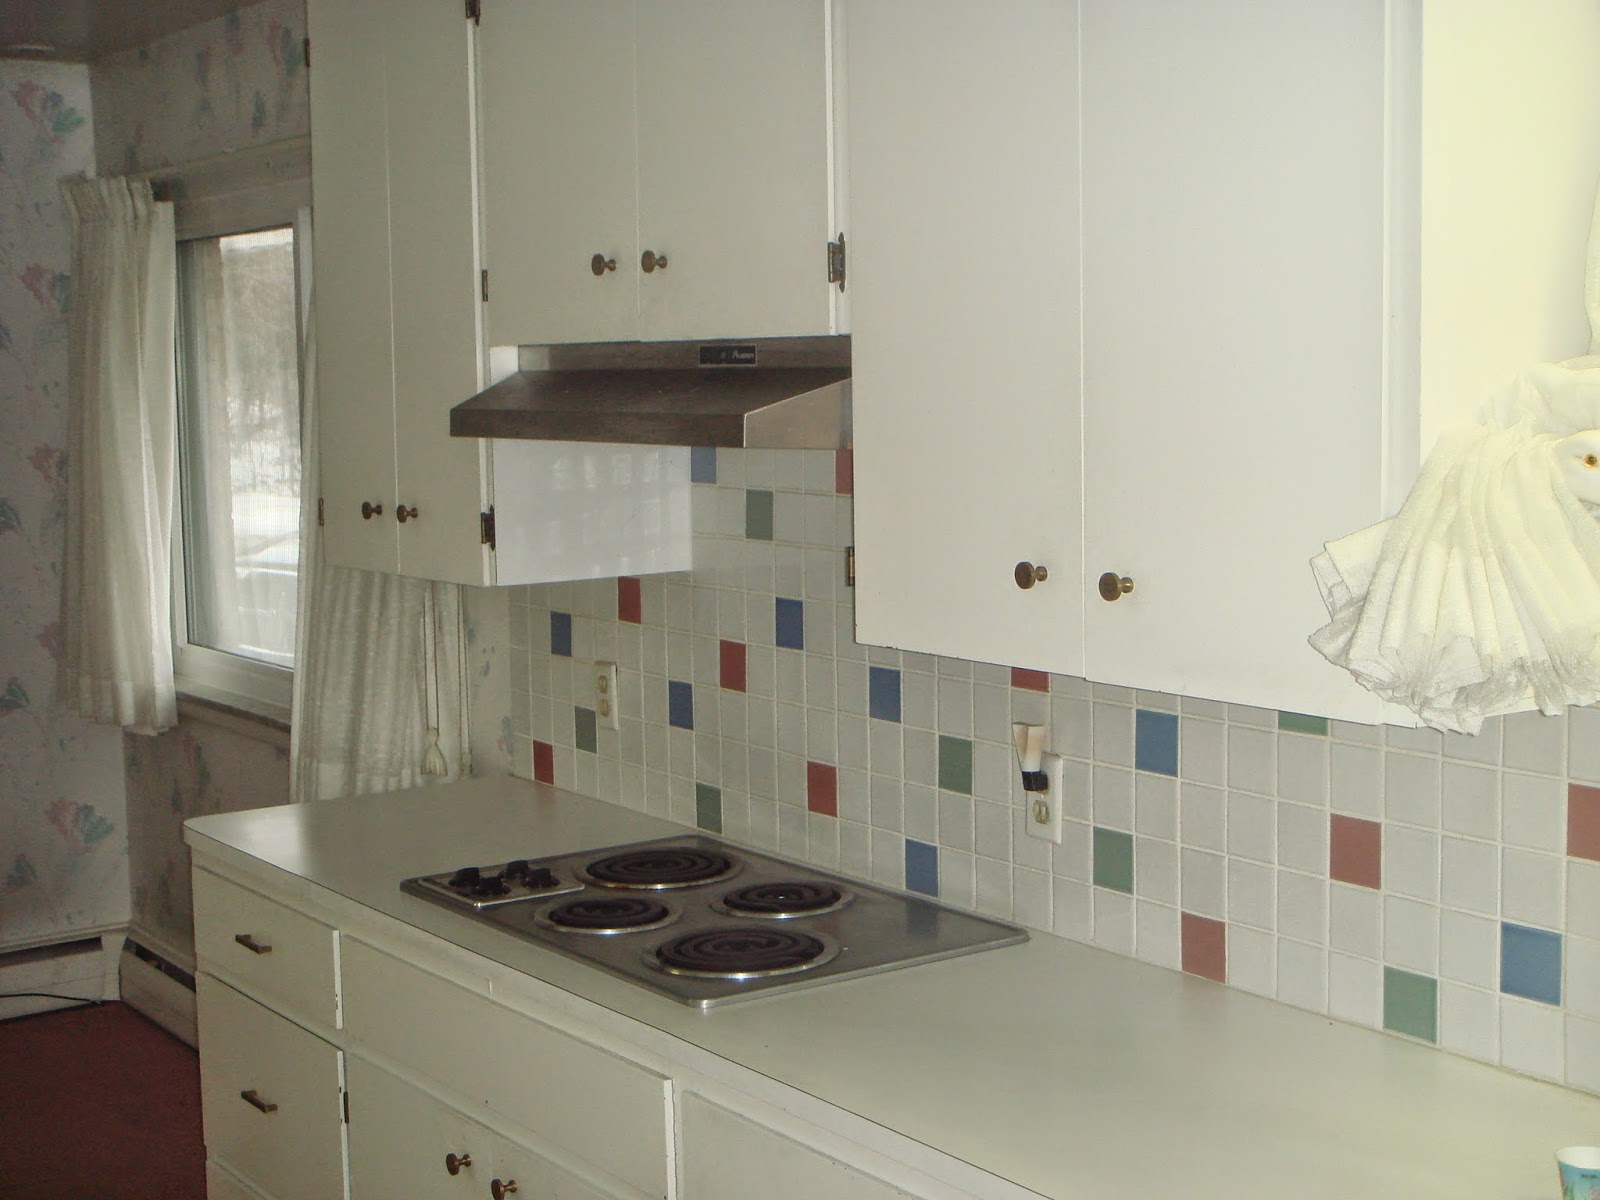
BUDGET MAKEOVER- TILING OVER TILE FOR KITCHEN BACKSPLASH

First I have to mention that I wasn't trying to cut corners. I knew this was a temporary update and after removing tile from the bathrooms and foyer in this home, let's just say that there was no "popping" tiles off….walls were coming down with it! I have gutted a handful of homes and removed tile in the past 15 years and have never seen tile done so well.  

So, knowing this, and the fact that I was going to eventually gutting this kitchen, I was looking for a temporary, budget friendly and quick solution. 


Because I didn't know I would be entering the blogging world over then, I didn't capture the 'during' moments but at least I have some before and afters.

These were taken the day we toook possession of the house.


I chose a tile that was much thinner and lighter than your typical 1/2" thick tile. because to be honest, I wasn't 100% sure about this entire project and wanted to make sure it would stick well, not look too thick and that the seam one seem on the end would not look odd.  

You can see here how thin it is compared to your traditional tile.  I found this at HD for $5 a 12" x 12" sheet and loved the colors.  The marble underneath is what I am using for the upcoming reno and it was found at Lowe's. 

 The seam I was talking about.  I just grouted it and it looks like I might have even painted it…oops:)
But I lucked out everywhere else as there were not other exposed seams.


 Yes, my cabinets are two different shades of gray…testing colors here for new cabinets


I went with a pre-mixed mortar for this application that was getting very little use. Grouted with antique white (I think) and called it a day!


I wouldn't recommend this for an area that is getting traffic or a lot of water but for this space, I think it worked perfectly and have not had any issues in almost 3 years and would totally do it again.   I actually still love this tile and am going to miss it because we will be ripping it out for the upcoming kitchen reno.  But just wanted to let peeps know about this option and hope it inspires you not to have to live with a backsplash you hate!


Monday, April 28, 2014

REMOVING OLD LEATHER FROM ANTIQUE DESK

When my customer told me about a desk she was dropping off, I had no idea about a leather top being involved.  Or that it had to be removed.

I had done many pieces for her before so knew she was super cool and had no over the top expectations for the desk. We really were not even sure how it would turn out.  

The plan was to remove it the best I could, sand the heck out of it, fill in all the crazy imperfections that were bound to happen and then paint it. 

After about an hour with my heat gun…this is how far I got:(  I love my heat gun for removing contact paper and loosening up glue but I decided to try using the iron method I had heard about for this project.

And I also call my mom:)


My mom is WAAAAAY more patient than I am at these types of projects.  Just dampened a rag, let the iron sit on top of the rag in one spot longer than you think you should (to loosen the glue) and start pickin!


The girls love having her over too.  The just hang out and chat:)


Natalie is going through a container of "dresser finds" that I like to save.  Fun to look at the old pictures, notes and things we find in the back of dressers.  Have yet to find the envelope full of money though.

So this is how it looked after my mom removed the leather and veneered top.  I had not sanded it yet but thought it just might be a good potential to stain and I really liked the planked look of the top.  

It wasn't going to be a perfect 'flawless' look but maybe a bit rustic and possibly pretty cool! 


After sanding with an 80 grit I used a fine finish sander to smooth out the top. I cleaned it well but knew the top wasn't going to be a uniformed color anyway so didn't even bother using a wood conditioner on this very raw wood.

After 2 coats of General Finishes Gels stains (50% mixture of Java and Antiqued Walnut), 2 coats of their polyacrylic topcoat in flat, this is what I had.  And I LOVE it!


I used General Finishes Enduro Black Poly on the base.  I am usually pretty stuck in my ways when it come to product but must say, I will never use another black paint again.


Thursday, April 24, 2014

UPDATED UGLY BLOND 60'S DRESSER

This is definitely going down as one of my favorite pieces of all times.  Not fancy, but different and fun!  It's kind of a 'modern meets industrial and bumps into coastal' look!


So this is where I started.  Your typical 60's blond dresser.  I love the hardware but one was broken, which ruined the chanced of using these at all.  Hate when that happens.

That's ok though because it took me in a whole new direction….

I have been wanting to do a project using pallet wood forever but not only did I only run across old, ugly pallets, I never had the time.  I didn't realize I was a "pallet snob" but I guess I am.  I wanted it to be a rough sawn wood but also, in nice condition.  

I had been eyeballing my neighbors beautiful, clean and empty pallet in they driveway for a few days and asked if I could have it.  She said "yes":)

I cut the pallet apart and besides keeping a few knots, kept the nicest pieces I could salvage.  I didn't have much left over.

After ripping down the pieces for the front and side trim I cut boards and staggered seams like I do a hardwood floor. And I have helped lay many hardwood floors!


I didn't have a real plan but after installing the top, things just kind of fell together.  I had the casters and hardware on hand and decided this beautiful green called Chopped Dill by BM,  would be perfect for the direction I was taking the stain.


 After sanding SUPER well, I stained the wood using the same products and steps that I did on my sons shelf project HERE.  I know I have been proclaiming my love for General Finishes Gel Stains lately, but I still love and will continue to use Minwax and Rustoleum for certain applications. 

Because of the nature of the wood (rough and deep graining), I needed a liquid stain to soak in, penetrate and get down deep.  Not to mention it's what I had on hand:)

This photo below is just after the application of the gray stain.  I brushed on with chippy and rubbing in good with rag.


I


AM


IN


LOVE!


Tuesday, April 22, 2014

PLYWOOD AS YOUR HARDWOOD FLOOR

This is where we started…the before picture of our dining room.  Yes, this is the house that after 80 some odd people went running out the front door after viewing it, I feel in love with even before I got inside.

Ok, so maybe "fell in love" is a bit strong, but I definitely saw the potential.


Now this is the dining room that I had just moved away from. I LOVED this home. I put months and my heart into designing every square inch of this house. I was sad.

Looooonnnnnngggg story short (it was too much money), we decided the smartest thing was to sell and downsize.

Although I sometimes long for a new, pretty and FINISHED house, I still know this was absolutely the best decision for our family.

ANYWAY….


I knew that we would be eventually getting hardwood throughout the entire house but that was many months away and I had been dying to try this for years.  We had to put a subfloor down anyway so this would not only fix my need to try this project, it would also look better than the nasty carpet and it didn't need to be removed when we went to lay the "real live" flooring.

Carpet ripped up and a million staples removed.

I choose the nicest and least expensive ply I could find in the thickness that was needed for the sub.

I had Lowes rip it all down into 5" stripes for me.  I'm pretty sure the employees go running when they see me coming to the lumber department.  I take FULL advantage of the fact that they can cut pieces for me when I can:)

I also did some stain testing on scrape pieces to pick my stain.

I believe I went with Minwax English Chestnut.


 We layed it like any other hardwood, staggering the seams and cutting pieces down when necessary.


I did good sanding before applying stain as well as after the first coat of stain because that first coat will raise the grain slightly.


I applied 2 coats of stain and 2-3 coats of a waterbased poly.

This was after 1 coat of the stain, looks a bit blotchy but after the second coat and then the clear, it looked beautiful.  Unfortunately you are going to have to take my word for it because this is my "after" picture.


I have no right, NO RIGHT AT ALL, being a blogger because my after pictures of this project suck!


I am so ashamed.  I am embarrassed.  I am sorry.

But in my defense, I had not started blogging yet. I have been DIY'ing and working on projects all day, every day, for the past 15 years. Wish I knew...


But here is a close up of the floor taken by my then 8 year old of a tootsie roll as she worked on her photography skills.

Looks pretty, huh?!?!


I would definitely do this again as a budget DIY update to a space.

My tips would be to

  • purchase the best ply that you can afford (as there are different grades) 
  • use an oil base clear coat if you wanted this to last a long time
  • glue (like we did) before nailing
  • do NOT glue if this is a temporary, "get you by till you win the lotto" project