PAGES

Wednesday, September 26, 2012

ANTIQUED ANTIQUE

I know I say I love every piece I post about, but I do!  And this one is no exception.  


It was obvious, with the beautiful detail and turned legs, that this was a great piece and going to look amazing no matter the finish, but going with the classic creamy white, distressed and glazing it was defitely going to be a perfect finish.


My customer, who is pregnant with her first bambino, plans on using this as a dresser/changing table combination.  This piece is an inch or two taller than the normal dresser too, so perfect for this situation.

A lot of customers have been looking for the a dresser that they can double as a changing table and I think it's a great idea. 


Monday, September 24, 2012

UPDATED PIECES AND MARBLE INLAY

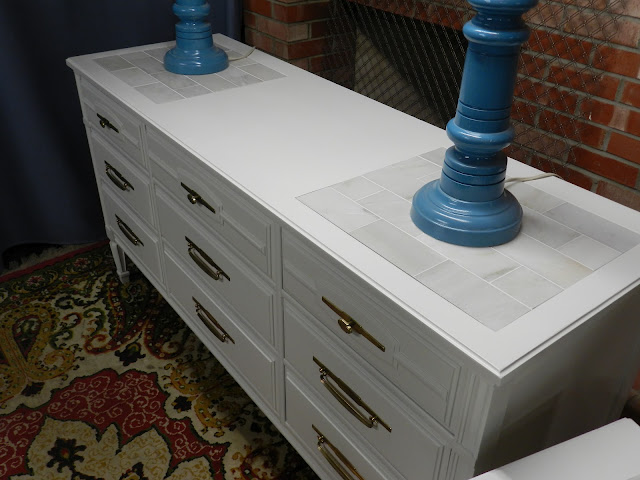
I had this set sitting in my "inventory" of goods for a few months.  It was beautiful!  The awesome detail, the size of the set, the fact that it was solid wood and wonderfully constructed, but the marble...not so pretty:(


I hate to say that the marble was "ugly", how can natural stone be UGLY?!?!  It really wasn't, but for this particular dresser, which I saw in a shade of white, with its pretty detail, the brown marble just wasn't gonna work.  But I had a plan.


A customer was eyeing the set. I knew she liked it, but not the marble.  I told her of my brilliant idea of replacing the marble with a light carrara or calcutta marble, weather she was going to buy the set or not, that was my future plan.

I knew that replacing the almost 1"thick piece of stone was way out of my budget, so didn't even consider that route.  But Plan A was to get an 18"x18" piece of 1/2" thick marble tile, cut it to size and lay it on a board inside the inlay. That way one would never know it was not a big fat thick piece of marble.  But after tons of running around and investigating, even with my "awesome" discounts (sarcasm) at the flooring places I belong to, I still could not get this down to under a $150 project.  I could not believe how much the price jumps up when you go larger than a 12" x 12" piece of marble!

So on to plan B.  Knowing I needed to go with smaller tiles, I thought the 3"x 6", laid out in a brick style would look best.  I wanted to keep the grout line tight and got SOOOO LUCKYYYYY that I could make them fit perfectly with only having to cut the ends.  That never happens to me!

I purchased the tile at Home Depot.  I had my daughter with me and she could not believe that I was removing every piece of tile from the box, inspecting them for perfection. LOL!  That's what I do if it's a natural stone.  You should have seen me when we did our master bathroom.  I literally grabbed a seat, on the floor at Homey D and went through TONS of boxes hand picking my pieces.  I am sure they were not crazy about it but I don't care!  This stuff is expensive and I am picky!


After purchasing my materials, tile and board, I got to work. I cut the boards to size.  Dragged out my tile cutter and cut my tile.  I didn't want to use mortar because of the thickness it would add so used an adhesive for marble and stone that I had left over from a project on our last home.  Normally I would only consider using adhesive over mortar on small, low traffic areas like a back splash, so it was perfect for this type of project.


My wonderful father in law came through for me...again!  He had some bright white grout laying around so I didn't have to purchase an entire box when I only needed about 1 cup of grout.  I normally would say white grout is the devil, but for the top of this dresser and tiny grout lines, I knew it would look best.  Not to mention I will be sealing the stone and grout.

 Definitely worth the extra time.  And the project, because I had some of the materials, came in at around $50.


And now I have a nice marble cutting board in my kitchen!!


Friday, September 21, 2012

PRETTY PURPLE PIECE

I am just loving this new piece I finished for a customer today.  It's rare to find a dresser with 12 drawers and such pretty detail with the curved front.  It will be perfect for her family room for extra storage.


We both loved the existing vintage style hardware but after I sprayed out the dresser, I just wasn't digging the finish of the hardware with the new color. I picked one of my favorite hardware finishes...Rustoleum "champagne".  It is an interesting cross between gold and silver, just a nice, soft finish that goes beautifully with most any color.


Here is the before picture...was even pretty before the makeover:)

Monday, September 17, 2012

NOOOOOOOO!!! (in slow motion and all dramatic)

Anyone remember that post were I made this pretty candle holder out of decorative metal sheets?

Very nice....


Well my daughter was dusting for me and found a surprise!  The very pretty candle in the glass jar, which was burning for a while the other night, ruined my dresser:((

 The glass must have become so hot it lifted 2 layers of primer, 3 layers of pigmented lacquer and 2 layers of clear lacquer!!!  UGH!!!! DO NOT WORRY all of my customers...this was NOT the lacquer that I have used on all of your pieces, this was an experimental product I was trying and I always use the "experimental"products on myself first.

My sweet 9 year old is like "it's OK mom, you can fix it".  I am gonna fix it all right... by putting that candle holder right over top of it! I don't have time for this.


On a better note, how do you like my wall of pictures?  You know how they have all those great tutorials on "how to hang pics", just so you don't have to put 100 tiny holes in your wall?  Yeah, well I didn't do that.  I now have 100 tiny holes in my wall and a lot of patching to do:)  


These silhouettes are my favorite. My kiddos when they were about 4, 3 and 18 months.  I would give a million dollars to have this this age again!


Saturday, September 15, 2012

DRAWERS, DRAWERS AND MORE DRAWERS!

This is one part of my job I do not particularly enjoy...taping off the drawers.  But it is so necessary to do a good job of taping them off so you can get a nice clean paint line, just looks prettier and more professional.  

It's not so bad when I have only 4 or 6 to do, but sometimes I let them stack up and do a bunch at once.  So, I find a comfy spot on the floor with some good music and coffee and get to taping!


I get all my newspaper from the only person I know who still gets the Sunday Press my sweet and pretty 95 year old grandma.. LOVE HER!!  She saves them all up for me and when I go visit her and get the paper, she still tries to stuff me with ice cream...LOVE HER!!


 Gotta love the pretty curved drawers!


Why does it look like a lot more than drawers for 2 dressers?!?!

Do you like my grafitti?


The dresser in the back has holes drilled and is going to be a beautiful Master Bathroom Vanity


You definitely want to drill the holes before your pretty paint job.


Monday, September 10, 2012

WELL, WELL, WELL, LOOK WHAT WE HAVE HERE....

I run to Lowes a lot.  And I mean A LOT!!  But I am always making a B line for particular things and don't really have time to browse around.  Well yesterday, Marc and I were there to get some pipe cut for a project and while he was busy with the pipe cutter person, I decided to check out the lights.

What a pleasant surprise!

Doesn't Ikea have something like this?

Pretty old world chandelier


Beautiful metal shade type chandelier


And the pretty matching hanging pendant


Impressive selection of lamps too and their prices are awesome!

Love me some mercury glass:)


This rectangular sconce would be great in a bathroom


Saturday, September 8, 2012

I THINK THEY ARE KEEPERS!

I sometimes like to try and sneak a few random pieces or projects in with my custom pieces I do for people. Here is an example of one of those projects.

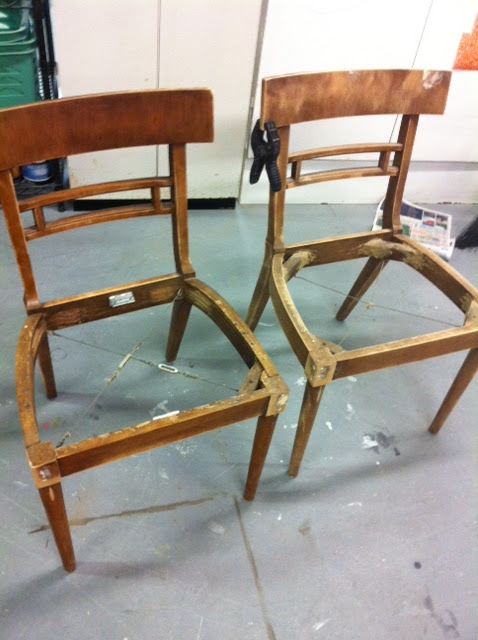
I really though I might be wasting my time working on these, although they were sturdy and solid, they were so beat up and super ugly and really, who needs just 2 chairs??

Well obviously I DO!!!  I am loving how they turned out in the black lacquer.  I removed the strange metal screen thing from the back of the chair and spray painted it gold (duh!)

And have I mentioned that I am also a fabric hoarder.....no?  Well I am.  But it does pay off because this pretty soft coral looks so nice with the black and gold.


Here is the before picture.  As usual, I didn't think about it until I had it all stripped down, but they was UUUUGLY!


Thursday, September 6, 2012

DISTRESSING AND GLAZING

Now I know why so many people only do distressed and "antiqued" pieces!  No pressure to be perfect!  I actually enjoyed sitting down, listening to music, distressing and glazing this piece.


But it didn't always look this pretty.

It all started with a pretty ugly dresser.  Was I the only one who saw the potential in this little guy?!?!  I was feeling all sorry for it because everyone just walked right by and never even looked twice,  so I decided to make it my personal project.

After filling in A LOT of holes, I also decided to fill in the horizontal lines.  They were just making for any good hardware options.


The top was in excellent condition, so decided to make keep it wood. After stripping the top, I covered in well and prepped it for spraying the lacquer by sanding, sanding and sanding some more, priming, sanding again and spraying on a few coats of the pigmented lacquer. 

Afterwards I did another light grit sanding, prepping for the glaze. Distressing in NOT easy after using lacquer!  It is such a great and durable paint, it takes tons of work to bring it down to the wood again.  

I used a sponge brush to apply the glaze because I wanted to lay it on kind of thick.


Many different glazes to use but General Finishes is what I used on this piece.  Super easy product to work with.


Then wiped it down with a dry rag as I found that a damp rag took too much glaze off.  There are SO MANY ways and options when it comes to glazing!


Then I took one of my big fat fluffy brushes and feathered out the glaze to make it blend in more.

Afterwards I stained the top and sealed the entire piece.

Below is a picture of a great big "ooops" created by my near perfect husband.  Can you see it??

The middle and bottom right hardware is off:( 

I KNEW I should NOT have let him drill the holes when he was standing there looking at me on a Friday night, after a long days work, with his second beer in his left hand a drill in his right, looking antsy because the Tigers game was getting ready to start and I KNEW he wanted to hurry!  

Thank goodness I am a "hardware hole filling expert" and good at mimicking faux finishes:)


Sunday, September 2, 2012

STARBURST MIRROR TUTORIAL


 I know! I know! The starburst mirror isn't a new concept and has been pretty popular for a while, but what is a funky Mid Century house (or any house for that matter) without one?!  I'm sure there are many DIY tutorials all over the blogosphere, but after making a few for myself and others, I thought I would put together a little one of my own.  Here are a few DO's (and DON'Ts)

Below are examples of 2 different ones I have made in the past.  The top being a little "fancier" because of the frame around the center mirror and the bottom is an example of a more simple startbust mirror, without the frame. 


A small version for my girls room


You really can make any diameter you want.  Whatever you think will fit your wall space. But to keep it simple, I will use the dimensions of the larger, first mirror I have pictured.

For materials you will need (all materials were found at hobby lobby)
  • a large mirror for the center  (My top starburst was a 10" mirror), 
  • a wooden crochet hoop thingy (big enough for your mirror to fit into, mine was 10") 
  • 48 dowels of whatever thickness you want.  I actually used 2 different size dowels, thickness wise, and mixed them up... not because I am super creative, but because I didn't realize some were smaller until I got a cuttin and was to lazy to run back to the store.  But I really do like how it turned out in the end.  
  • hot glue gun
  • tough cardboard to use as base to adhere mirror and dowels to

I ended up getting the 48" long dowels so I could cut them in half and use both pieces.

1 - Trace around the mirror and cut out the circle.  This will be the main support.


***Now here is a very good example of a DON'T...When tracing out the cardboard for the back             support, trace just the mirror, NOT the mirror with the hoop around it.  This will ensure that the carboard backing will not show when all done.

2 - cut out circle from cardboard

3- cut dowels to desired lenths.  I used a miter saw and cut them to lenths of 16", 14" and 12".

4 - find a pattern that you like.  I used a "TALL, SHORT, MEDIUM, SHORT, MEDIUM, SHORT, TALL" pattern and it only took me about 8 days to figure out this pattern out!  So unless your feeling really creative...save yourself a lot of time and feel free to use this pattern:)

5 - hot glue the dowels on


6 - Flip it over and hot glue the hoop on. I did have to do a cut on my hoop to make it go nicely around the mirror (sizing it up beforehand), then added some wood filler to the small space the cut created.  If you look really close, you can see the cut on the top of the hoop, this was before I added the bit of filler.


7 - After the filler was dried and sanded, I spray paint it.  I used a metallic gold by Valspar, but any color will look great!

8 - after paint is dry, adhere the big mirror in the middle with hot glue and randomly add mirrors of whatever size you want.


I had to sneak in a photo of my new pinch pleated curtains I made for the den, the room really needed some color.  There is an easy tutorial I did a while back if your interested:)


Oh, also... this is pretty much what my dining room looks like 24/7...always some fancy craft going on.

Very interesting body proportions on the little peeps miss Ava.....:)  Love her!