PAGES

Saturday, January 19, 2013

ADDING FEET / LEGS TO A DRESSER


This might be one of my favorite projects!  I have been brainstorming for weeks about adding feet to the bottom of some of these great pieces I have been finding.  I know what catches peoples eye and it usually isn't the pieces sitting on the ground.

For example, this guy is great...great size, great drawer space, nice pretty curves and detail but unfortunately, it didn't have feet:(

 After removing the back so I could get to it with the clamps, I added some 2x4 blocks of wood, lots of glue and lots of screws.


In this case, I actually used fence posts because I didn't like the bun feet that I was finding.  I wanted something with more height and a bit more fancy.  Because I am so fancy!


PERFECT height for a baby changing table!

Friday, January 18, 2013

NEW DINING SET AND HOW TO DO A LIGHT GLAZE ON A CHAIR

I just finished up this pretty dining set and am loving how it turned out!  I worked on it when I could in between other projects and custom pieces.

Not only did it take so long because I was busy, but this guy needed some serious WORK!  Not sure why I am drawn to the pieces that need a complete overhaul and fixing up, but I do.

Whoever owned this table put a very dark stain on the table top but not the legs OR THE LEAF! I was worried that although I was going to be stripping and sanding, that the leaf might turn out a little different.


Those chairs were disgusting! I sometimes reupholster over existing fabric if it is in excellent shape, just to create extra padding, but I just couldn't do it in this situation.  So don't worry to anyone who may buy this set...this is NOT under your tush!


The chairs also needed some structural reinforcing...this is where Marc comes in.  Maybe he goes a little overboard on the screws (like 20 in each chair:) but he is really good at repairing and these guys are better now than the day they were built!

Even had to make a few new pieces for this chair.


Quick trip to Lowes and using the router to get the same profile on the edge...it's good to go!


 This is when I really started to get nervous about the leaf turning out different.  After stripping it the table was still SO DARK!  I sanded, and sanded, AND sanded until I felt they were good.


I think the toughest part of refinishing for me is choosing the color or finish. I w REALLY wanted to gold leaf the detail on the back of the chairs but I was nervous it would not appeal to a larger crowd.  I ended up mixing my own color because that's what I do. I was going for a soft linen / soft grey combo and that is exactly what it is!

Here they are all sprayed and ready to go...

I lightly distressed them

Then, with my favorite glaze, VanDyke Brown, I went to work...

I diluted the glaze by about 40% because I wanted it pretty runny and light.


Just start brushing it on, concentrating on the nooks and sticking to a specific area, like the back of the chair including both back legs, before moving on.

 I keep everyones stinky old stretched out socks in my family (I draw the line at using old underwear) and use them in my shop.  Just slip it over your hand and wipe it down.  Add a little here and there if you have to and re-wipe.

Let dry for at least 24 hours and use a clear coat.  I sprayed these chairs with my HVLP and a lacquer clear coat for protection but you can use whatever protection that you like.

Last step was to finally get rid of that nasty old fabric and reupholster.  Just to be "safe" I ended up using a pretty steely grey/blue fabric.  Looks great with the finish!


Tuesday, January 15, 2013

UPDATED CHANDELIER...IN ORANGE!


 I can't pretend this was an easy project...all those arms and scrolling and twists and turns!


After giving it a light sanding and cleaning, it was sprayed with a can of Kilz.  I knew my customer was going to be getting new sleeves on the fixture and bulbs, so decided to leave them on to protect the "innards", which is really just a gross word for electrical wires:)


She had a vision of orange and asked me to spray it in the color I have in inventory called"startling orange".  I LOVE how it looks with the gorgeous round bulbs!  I am also loving the turquoise clock in the background...very nice Jen:)


Monday, January 7, 2013

MY NEW (OLD) COFFEE TABLE, FUNKY COUCH AND ORIGAMI!

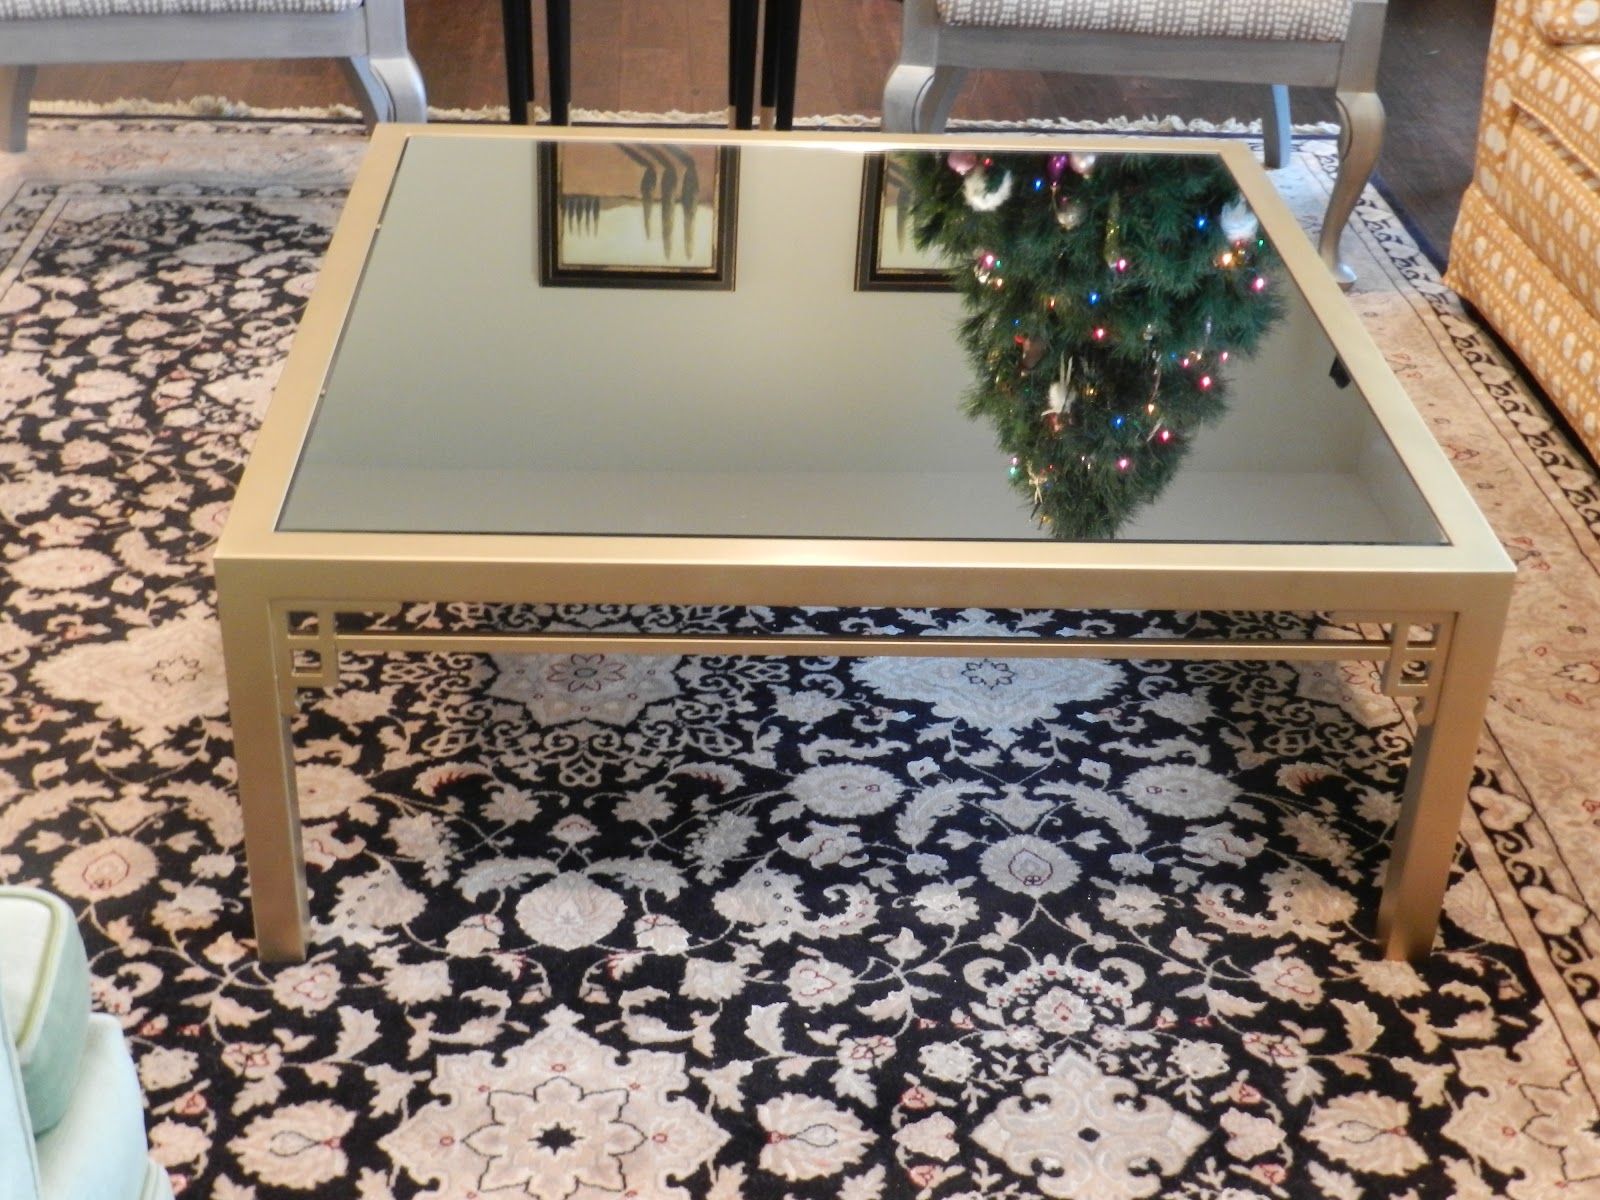
I was picking up a dresser a few weeks ago and this coffee table caught my eye. It was in the basement of the estate I was at and because I am super nosey, I was peeking around.  They had sold most everything else and evidently nobody could see the beauty in this...that's where I come in:)

Look at the sweet detail on the inside corners!


The smokey black glass top had to go and it needed a new finish.  My husband was all like "why are you spraying it the same color"?!?!  Does he not know that there are very different types of gold?  The original finish was ugly, brassy 80's gold.  I was looking for a more vintage glamorous look.


I had a mirror custom cut from Vos Glass.  I love these guys and get all of my mirrors and glass custom cut there.   They are fast, reasonable priced and do a great job.

I LOVE this coffee table!  It's huge and fits my space perfectly.


I have to show you the couch I bought while at the same house.  It is so funky and you either love it or hate it.  I love it and most people hate it! LOL!  Straight from the 60's and in mint condition!  I fell for the style and trellis pattern, even like the orange color.

You should have seen my husbands face when I made him go back with me to pick it up.  I thought I even saw a tear.  He was like "Julie, why don't you just go buy a new couch" and I am like, "because honey, I have problems and one of those problems is the inability to buy something brand new without an immense amount of guilt".

I probably do need a new though, which has been on my "want" list anyway.  I'll admit it is VERY busy in the room right now with the mirror on the table, crazy patterned sofa and this very busy rug.  You need to take an Advil before sitting in the room:)


On another note...check out my sons origami work!  He rocks at this little "hobby" and his patience for this blows my mind!  We spray painted this guy and he is now a part of our decor.  I think I am going to have him make a bunch of different sizes and do something fun with them.  

Wednesday, December 26, 2012

ALMOST LEFT BEHIND!

So, this guy has been sitting in my inventory for over 6 months and not so much as one person has noticed it:(  I couldn't take it any longer, something had to happen!

Look how great it this piece turned out!

I stripped and re stained the top, box and base.  The drawer fronts needed too much patching and TLC to salvage but I am loving the "two tone" look!


It might have been cool to use the wooden hardware pieces but one was missing and although I am pretty crafty, my wittling skills are not that good...yet:)


Saturday, December 22, 2012

FRENCH PROVINCIAL BEAUTY

I'm in love... with a dresser...again!

That's all I can say!


just one more thing...LOOK AT THAT GORGEOUS FINISH!


Friday, December 21, 2012

MY BOY GOT A NEW DRESSER...AGAIN

Because I refinish furniture and have pieces come and go all the time, my 13 year old Jack has happened to have 5 different dressers in his bedroom in the past year.

Now we have built, renovated and moved many times and I know I am blessed with very flexible and adaptable children, but last week when I was hauling his dresser out of his room because I sold it, he was like "um, mom...do you think I can have a dresser that I can just call mine and actually keep"?!?

I think he was feeling a little sorry for himself until I reminded him that there are some kids that keep there small handful of clothes in a cardboard box...if they're lucky.  He got it:)

Still, I was feeling a little bad about taking it away and told him to go into my shop and pick out any dresser and think of color he wanted.


Well, the color he wanted, I didn't have. Because I LOVE to experiment and mix colors myself, I combined a few to get what he was looking for.  I LOVE mixing colors and coming up with something a little different, but unfortunately when someone wants a piece "in that color", I really can not duplicate it exactly.  I need to stop.

Loving that beautiful high end, seamless finish!


Sunday, December 16, 2012

GIVING MILK PAINT A TRY

Don't worry my modern BFF's, I am not converting totally but have to admit, it's kinda fun having a paintbrush in hand and being a little creative.


I have used milk paint before but has been many years.  I had a secretary desk that I thought would be a  good piece to experiment on. 


The desk already had a nice coat of yellow on it, which I was going to just leave but then decided, after sanding it down, that I would try this pretty blue milk paint I had on hand.  After I painted it blue,  didn't like it because it was too baby blue for me, so I decided to use this pretty green color milk paint over that (your suppose to layer...right?!?!)

I have been seeing a similar decorative hand painted decal around the blogs lately and decided to try a freehand design myself. I did this before the distressing and glazing as I wanted it to look as original as possible too.  It's not perfect, but perfectly imperfect:)

I loved how the green looked especially when I distressed it and even more after I glazed it.  I really like how there are some areas where the blue comes through, some areas where the yellow shows and a few spots of wood peeking through.  Perfectly "aged".

I clear sealer coat and some new (old) hardware and it's done!


Thursday, December 13, 2012

TURNING A MCM DRESSER INTO A TV CONSOLE / ENTERTAINMENT CENTER

I am sure Marc had other things he wanted to do ALL DAY Sunday, but because he totally ROCKS MY WORLD...he build 2 new slide out, tilt down drawers, complete with new sturdy boxes for my customer, instead.


First, lets show ya the before picture...Hmmm

It all started with a vision I already had for this piece and was playing around with on my own.  Then one of my customers caught on to what I was going to do and jumped on board.  Knowing she was going to be our "guiney pig" project of sorts, she was cool with whatever we whipped up.  Thanks Jessica!

What we (Marc) whipped up was a pretty sweet situation!  First we removed the front face of the door with a sawzaw.  Not the most professional way but after building and renovating houses, this guy can cut a straight line with this thing like nobodies business! 


We wanted sturdier boxes for the tv components, so he built new ones.  I am not really sure how as I went Christmas shopping:)  But I am sure it had something to do with some wood, table saw, router and a nail gun.

Instead of one the original middle rail, as you can see from the bottom middle drawer, we opted to do two glides to support the heavier box.


Really, the hinges are the trickiest part of all.  You have only about an 1/8" on all sides to make sure it sits in there perfectly.  

He decided to use the back of the glides, that we did not need as temporary brackets after we measured where the drawer front should sit, which we did by removing the back off the unit, with the box set in place in the dresser, I was in front holding the door front perfectly where I wanted it up against the box while he made pencil lines from the back.


After we liked where the drawer front were sitting with the temporary brackets, he was able to attach the hinges.  You don't want to have to move hinges 5 times to get them perfect, so this is a great way to do it.

TIP-- as you can see I didn't finish the inside of the drawer front till AFTER everything was set perfectly, BIG MISTAKE!  Once you have it perfect you really don't want to remove those hinges again.  It took about an hour to get everything lined back up perfectly and had to basically repeat the whole process over again.  So finish the drawer, front, back and box (which I clear coated) BEFORE you get it all installed.


It turned out beautiful and we learned a LOT on this project of what to do and what NOT to do next time around.